Creating an accommodation record allows you to store important details about hotels, lodges, or other accommodations that will be featured in your itineraries. This guide will walk you through the process of creating an accommodation record, adding room types, and ensuring all necessary details are filled out.
Step 1:
There are two ways to access the Create Accommodation pop-up:
Option 1: From the Left Side Menu
Navigate to the left-hand menu, click on Accommodation, then click on Create.

Option 2: Quick Add Drop-Down Menu
You can also use the Quick Add feature from the top drop-down menu by selecting Create Accommodation from the available options.

Both methods will take you to the pop-up where you can start entering details about the accommodation.
Step 2: Define the Accommodation
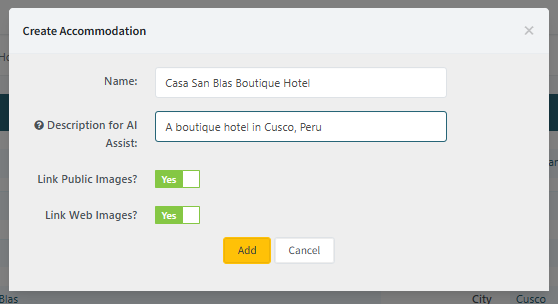
Enter an Accommodation Name and use the Description for AI Assist field to provide context that helps identify the correct property and generate details. This can be a short descriptive phrase such as “a boutique hotel in Cusco, Peru.” This information is used to assist with generating descriptions and related details. Always review generated content, as accuracy cannot be guaranteed.

You can also choose whether to include images during creation. Public Images attempts to pull publicly available images, while Web Images looks for images from the property’s website. Any images added can be reviewed or removed later.
If AI Assist is not enabled, simply enter the accommodation name and continue to the next step to manually complete the remaining fields.
Step 3: Fill Out All Required Fields
You’ll need to complete the following fields to fully create the accommodation record:
Name: Will be the official accommodation name.
Type: Choose the accommodation type (e.g., Standard, Boutique, Lodge, Traditional, Boat).
Tip for Admins: If a new accommodation type is required but not listed, see the guide on editing the Basic List.
Rating: Select the accommodation rating (e.g., Primary, Secondary, Alternative, Negative). Not sure what to choose, learn more about Ratings here.
Tip for Admins: If a new rating option is needed, refer to the editing Basic List guide.
Budget: Choose the accommodation budget category (e.g., Budget, Mid Range, Superior, Luxury).
Tip for Admins: You can add a new budget category by editing the Basic List.
Price: Provide the average price range for this accommodation.
Address: Enter the full address of the accommodation.
Phone: Include the contact phone number for the accommodation.
Email: Add the main email address for the property.
Public: Decide if you want to make this accommodation public and available to other users. This option is useful if you want others to be able to access and use the accommodation record.
Description: Write a detailed, descriptive summary of the accommodation. This description will be visible in itineraries and should highlight key features of the property.
Notes: Add any internal notes related to the accommodation. These notes will not be visible on the front end but are useful for internal reference.
Images: Upload images of the accommodation. See the section below for more details on adding images.

Step 4: Add Images to the Accommodation Record
Visuals are important to showcase the accommodation, so be sure to add relevant images. You can upload exterior views, amenities, and more. (Rooms have their own images)

If you need guidance on adding images, refer to the detailed How to Add an Image guide.
Step 5: Add Room Types
This section allows you to add specific room types for the accommodation. You can edit the Room Name, Internal Notes (visible only to your team), Public Description that will appear in itineraries and add images.
Adding Room-Specific Images: Clicking the image icon will allow you to upload images specific to that room type. For instance, if you're adding a "Balcony Queen Suite," you can include images of that specific room. These images will automatically be added to the itinerary when the room type is selected.

 | Note: Only change a room type to correct an error or if it's not listed on another itinerary. If a room type isn't available, create a new one. |
Adding Additional Rooms: You can easily add more room types by clicking the '+Add Room' button located at both the top and bottom of the section.

Create Supplier Record
If needed, you can quickly create a supplier record using the Create Supplier Record button. This will automatically generate a supplier record using the information from the accommodation you've just entered, saving time and ensuring consistency across your records.
